Couscous Lesson

Several weeks ago Raizy, the daughter of a good friend of mine taught me and her mother how to make couscous. Raizy married into a Tunisian/Moroccan family and learned how to make couscous from her mother-in-law. I have wanted to learn how to make couscous ever since I bought Paula Wolfert’s Couscous and Other Good Food from Morocco. I love North African food and have always used instant couscous and always felt like I was cheating. I thought it would be too complicated to make, but after my lesson, it really isn’t that hard. It is a bit time consuming, but you can make it in advance and keep it in the freezer. My husband made a vegetable tagine and we used one of our two packages of couscous. It was delicious. I am saving the other one for when we move to our new home next month. Unfortunately, I forgot to take pictures of the vegetable couscous, but I promise I will feature the couscous in February.

Thank you Raizy and Miriam, I really enjoyed our “Girls Night Out”.

Raizy's Couscous
Ingredients
  • 1 kg 2.2lbs white semolina
  • 1 tablespoon salt
  • 1/3 cup canola or light olive oil
  • 5-1/4 cups water
Instructions
  1. Couscousier
  2. Fill 1/4 of the bottom of a couscousier with water and place on medium heat.
  3. Cornmeal Texture
  4. Place 1kg of semolina in a very large bowl.
  5. Oil and Mix
  6. Mix the salt into the oil and drizzle over the semolina.
  7. Cornmeal Texture
  8. Mix with a hand-held mixer until you get a cornmeal consistency.
  9. Thicker Cornmeal Consistency
  10. Slowly drizzle 1-1/4 cups of water to the semolina mixture and mix with a mixer until you get a thicker cornmeal mixer. Let the mixture rest for five minutes.
  11. Sifting 1
  12. Sift the semolina in a second very large bowl and set aside any lumps that you cannot breakdown.
  13. Couscousier Inside
  14. Steam Couscous
  15. Place the mixture in the top of the couscousier and steam for 30 minutes over medium heat.
  16. Steamed Couscous
  17. Pour into a very large bowl and let cool. Then add 4 cups of water, stir in with a wooden spoon and let the mixture rest until all of the water has been absorbed. Sift again, removing any lumps and steam for an additional 30 minutes on medium heat. Pour into a large bowl and let cool.
  18. Fine Consistency
  19. Sift the mixture and place in plastic containers or use right away. You can keep the couscous in the freezer for a couple of months or in the refrigerator for three or four days.

Happy 2008!

The previous year was a whirlwind for me. It was a year of a couple of firsts, one was celebrating the first anniversary of my first and hopefully only marriage. Second, was writing my first blog. I have really enjoyed sharing new cooking and travelling adventures with all of you and don’t worry, there is much more to come.

I wish all of you a happy and healthy 2008. May all of your wishes come true.

New Year’s Eve is not widely celebrated here in Israel because in Judaism, the new year is Rosh Hashana, which normally falls in September or the beginning of October, depending on the Jewish Calendar. We went to a friend’s house for dinner, but did not say celebrate the new year, it was just a dinner with friend’s. We feasted on entrecote, lamb chops, lentils, zucchini, salad, homemade tomato bread, roasted potatoes and plenty of champagne.

To close the meal, I made Tarte au Citron. I know some of you will shriek that I made a parve version of this tarte, but it was as delicious as when I make it with butter. I know that sounds crazy, but it is true. This recipe is from chef Thomas Keller of French Laundry, Bouchon and Per Se restaurants in the United States. The crust is made with pinenuts, but you could easily make it with a plain tart crust of your choice. Just make sure that the tart crust does not contain a lot of sugar. The lemon filling is lemony and very creamy because you make it using sabayon method, which means that you rapidly whisk the mixture over a bain marie until it is thick and creamy.

Tarte au Citron
Recipe from Bouchon by Thomas Keller
Ingredients
  • 1/3 recipe Pine Nut Pastry Dough see accompanying recipe
  • 2 eggs cold
  • 2 egg yolks cold
  • 3/4 cup granulated sugar
  • 1/2 cup fresh lemon juice
  • 85 g 6 tablespoons cold unsalted butter or margarine, cut into 6 pieces
Instructions
  1. Preheat the oven to 180C (350F) degrees. Generously butter and flour a 9-inch fluted tart pan with a removable bottom and refrigerate it while the oven preheats.
  2. Remove the tart pan from the refrigerator. Use your fingertips to press the chilled pine nut dough evenly over the bottom and up the sides of the pan. Trim off any excess dough.
  3. Bake the crust for 10 to 15 minutes, then rotate it and bake for another 10 to 15 minutes, or until it is golden brown. Remove the crust from the oven and let it cool while you make the filling. (There may be some cracks in the crust; they will not affect the finished tart.)
  4. Bring about 1-1/2 inches of water to a boil in a pot that is slightly smaller than the diameter of the bowl you will be using for the filling. (The bottom of the bowl should not touch the water.)
  5. Meanwhile, in a large metal bowl, whisk the eggs, yolks and sugar for about 1 minute, or until the mixture is smooth. Set the bowl over the pot and, using a large whisk, whip the mixture while you turn the bowl (for even heating). After about 2 minutes, when the eggs are foamy and have thickened, add one-third of the lemon juice. Continue to whisk vigorously and, when the mixture thickens again, add another one-third of the lemon juice. Whisk until the mixture thickens again, then add the remaining lemon juice. Continue whisking vigorously, still turning the bowl, until the mixture is thickened and light in color and the whisk leaves a trail in the bottom of the bowl. The total cooking time should be 8 to 10 minutes.
  6. Turn off the heat and leave the bowl over the water. Whisk in the butter a piece at a time. The filling may loosen slightly, but it will thicken and set as it cools. Pour the warm filling into the tart crust and place the pan on a baking sheet.
  7. Preheat the broiler. While the filling is still warm, place the tart under the broiler. Leaving the oven door open, brown the top of the filling, rotating the tart if necessary for even color; this will take only a few seconds, so do not leave the oven. Remove the tart from the broiler and let it sit for at least 1 hour before serving. Serve at room temperature or cold.


Pine Nut Crust
Recipe from Bouchon by Thomas Keller Because this dough uses only one egg, it is difficult to make in a smaller quantity. You will use one-third of this recipe to make the Lemon Tart; freeze the extra dough for another time.
Ingredients
  • 2 cups pine nuts 283g or 10 ounces
  • 1/3 cup granulated sugar
  • 3 cups all-purpose flour
  • 226 g 1 cup unsalted butter or margarine, at room temperature (2 sticks)
  • 1 egg
  • 1 teaspoon vanilla
Instructions
  1. Place the pine nuts in a food processor and pulse a few times. Add the sugar and flour and continue to pulse until the nuts are finely ground. Transfer the mixture to a large bowl.
  2. Add the butter, egg and vanilla and mix to incorporate all the ingredients (the dough can be mixed by hand or in a mixer fitted with the paddle attachment). Divide the dough into 3 equal parts. Wrap each piece in plastic wrap and refrigerate for at least 10 minutes before using. The extra dough can be frozen, wrapped well, for up to 1 month.

Baking for Mama – May She Rest in Peace 1912-2007

My 95-year-old Grandmother passed away Saturday 29 December in the USA, which had me thinking of all of the wonderful times we had cooking together. I owe a lot of my cooking skills to her. She encouraged me to take cooking lessons and taught me how to make all of the family holiday recipes. During December, we always baked all of the special goodies for family near and far. Family would always come to visit during the Christmas vacation, and even though we did not celebrate Christmas, we always had special goodies around, such as her chocolate cake, 1-2-3-4 cake, her amazing butter cookies, Rose’s apricot tarts, and her schnecken. But the baked goods that she always looked forward to was the big package of German goodies that family friends in Germany sent my grandparents. The package came from the famous Lebkuchen Schmidt bakery in Nürnberg. She would open the package and take a deep whiff, and then delicately open the packages. We would stand there in excitement smelling the spicey goodness and salivating, waiting to take a bite of the lovely Elisen lebkuchen and speculaas cookies. You could smell the cardamom, cinnamon, clove and nutmeg all over the house.

I usually buy lebkuchen when I am in Germany, but this year I was unable to make a trip there before Christmas, so I decided to do the impossible and try to make some myself. I knew that they would not be as good as Lebkuchen Schmidt, who have been making these amazing biscuits since 1927. My first attempt resulted in overbaked biscuits because I had spread the dough too thin on the oblaten wafer. However, the second time round I managed to get it right and even my famously critical other half drooled every time he came close to one. I decided to leave my lebkuchen natural and used square oblaten instead of round. If you cannot find oblaten wafers, which are similar to communion wafers, then use rice paper.

I couldn’t find candied orange, so I made it myself using thick-skinned navel oranges.


Nürnberger Elisenlebkuchen
Servings: 75 pieces of five centimeter (2 inches) diameter
Ingredients
  • 470 g 2-1/3 cups sugar
  • 4 eggs
  • 1 teaspoon of vanilla sugar
  • 400 g 14 ounces hazelnuts (one-half milled rough and the other fine)
  • 80 g 3 ounces whole almonds, finely chopped
  • 50 g 1.7 ounces roughly chopped walnuts
  • 100 g 3.5 ounces of finely cut candied orange and lemon peel respectively
  • Freshly grated untreated orange and lemon peel
  • 1 teaspoon of finely chopped ginger root in syrup
  • 1 teaspoon of the following milled spices: cinnamon cloves, allspice, coriander, mace, cardamom, nutmeg
  • <a href="http://www.flickr.com/photos/baronesstapuzina/2145105476/" title="Oblaten Package by BaronessTapuzina on Flickr">Oblaten Package
  • 2 packets of oblaten wafers 5 cm (2 inches diameter)
Punch Icing
  • 130 g 1 cup icing sugar, sifted
  • 2 teaspoon of rum
  • 2 teaspoons of red wine
Chocolate Icing
  • 20 g .7 ounces of bittersweet chocolate (preferably 70%; high quality)
For decoration:
  • A selection of nuts and candied fruit
Instructions
  1. Use the egg whisk attachment of an electric beater to beat sugar, eggs and vanilla sugar so that the foamed mass has doubled and the sugar is dissolved.
  2. Ground Hazelnuts and Almonds
  3. Candied Orange Lemon and Ginger
  4. Then add the nuts, candied and fresh orange and lemon peel, ginger and spices. Cover the batter and leave it in a cool place for 24 hours.
  5. Oblaten Sheets
  6. Unbaked Lebkuchen
  7. The next day form small, approx. 15 g (1 rounded tablespoon), balls from the mix with wet hands and place each on a wafer so that a 3 to 5 mm broad margin remains. Place the wafers on a baking paper lined baking tray and bake until light brown for 10 to 12 minutes at 200C (400F) in a preheated oven.
  8. The Lebkuchen should be well risen but not quite finished inside because they have to further develop and remain soft inside. The finished Lebkuchen should be slid onto a drying rack to cool. Place one-third of the cookies to the side: they should remain natural, e.g. without icing.
For the punch icing:
  1. Mix the sifted icing sugar and to a smooth consistency with rum and red wine. Then dip the upper surface of a further third of the Lebkuchen (not the wafer side) into this icing.
For the chocolate icing:
  1. Melt and temper the chocolate, and then dip the upper surface of the remaining Lebkuchen. Leave the iced Lebkuchen on a drying rack to dry.
  2. Decorate the lebkuchen with nuts and candied fruit while the icing or natural cookie is still soft.
  3. Store the completed Lebkuchen in an airtight tin. Cover the cakes with greaseproof paper and lay a few apple peelings on top. This keeps them soft and moist. Try to let the cookies mature for about ten days before serving them.

Chestnut Heaven

One of the things that I really like about winter is chestnut season.

I remember fondly when my grandmother would splurge and buy chestnuts every december. They were quite expensive when I was a child, but the house smelled so nice when she was roasting them in the oven. My first experience of eating fire roasted chestnuts was not until I lived in Europe. I couldn’t wait to see the vendors rolling their carts yelling “Roasted Chestnuts” in German, Italian or French. I loved biting into their floury goodness and now I enjoy finding recipes in which they can be used to accent a dish.

I had some goulash meat in the freezer that needed to be cooked and I started looking at recipes I hadn’t made yet. And since winter has begun here in Israel, and I had just bought a big bag of chestnuts, I started craving a hearty winter dish. I found an amazing recipe bursting with flavour. I am not sure where this dish originates from, but I know that it is from somewhere in the Caucasus. The spices, the walnuts, the pomegranate juice impart an amazing, dare I say orgasmic flavour to the dish and the house smelled like a spice market. I highly recommend this recipe and I will definitely make it again and again.

I didn’t have any sour apricots on hand, so I used dried sour cherries, but they were lost in the dish. I served it over a brown rice.

Beef Stew with Chestnuts and Pomegranate
Ingredients
  • 455 g 1 lb chestnuts roasted and shelled
  • 2 medium onions
  • 1/4 cup canola oil
  • 800 g 1-3/4 lbs goulash or stew beef, cut into 1/2-inch cubes ( I used frozen goulash meat that I thawed out)
  • 1/4 teaspoon turmeric ground
  • 1/4 teaspoon saffron threads crushed
  • 1/2 teaspoon cinnamon ground
  • 1 cup walnuts minced fine
  • 1/4 - 1/2 cup of sour apricots cut into quarters
  • 1 cup pomegranate juice
  • 2 tablespoon tomato paste
  • 3 tablespoon lemon juice freshly squeezed
  • 1-1/2 cups chicken stock
  • 1 teaspoon honey or date honey
  • 1 teaspoon salt
  • 1 garlic clove minced fine
  • 1 teaspoon black pepper
  • 1/4 cup fresh parsley as garnish optional
Instructions
  1. Heat the oil in a heavy casserole over medium heat. Saute the onions and garlic for 10 minutes. Raise the heat to high, add the meat, turmeric, salt, pepper, and brown meat on all sides. Stir in the saffron, cinnamon, walnuts, sour apricots, tomato paste, and chicken stock. Bring to a boil, reduce heat to low, cover, and simmer for 1-1/2 hours.
  2. Note: Depending on the cut of meat, you may need to cook this for 2 hours. Just make sure you check it half way through because you may need to add a little more liquid.
  3. Add the lemon juice, pomegranate juice, and chestnuts. Stir well, cover and simmer for 10 more minutes. Serve over a bed of saffron rice.

Spanish and Indian-Inspired Hannukah

I really like finding interesting recipes that may not be holiday-specific, but fit in with the types of foods that are typically served for the holiday. And I like to mix cultures in a meal. I think it makes the meal more interesting. So, for this meal I decided to serve a Spanish potato fritter which is also made in Italy, and an Argentinian cut of meat with Indian spices. I just love global cooking!

Try it some time, instead of having a themed dinner party where the entire menu is from one country or region, try making the menu diverse by making a Swedish appetizer, Middle Eastern main dish, Thai side dish and a Brazilian dessert.

I decided to make another variation of the Ashkenazi potato latkes and make something a little more Sephardi, so I made potato and sage fritters. These are quite light and are perfect for a hot appetizer. They are very easy to make and can be made a few hours ahead of time and reheated in the oven. The recipe only called for one tablespoon of sage. I like a nice sage flavour, so I added two tablespoons. I probably could have added more. The lemon is rather pronounced, so if you don’t like a strong lemon flavour, you could put in only one teaspoon of lemon zest.

Potato and Sage Fritters
Servings: 40 fritters
Ingredients
For the sponge:
  • 1/4 cup warm water
  • 2 tablespoons all-purpose flour
  • 1/2 envelope 1-1/8 teaspoon active dry yeast
For the fritters:
  • 450 g 1lb pound russet potatoes, peeled and cut into 1-inch cubes
  • Cold water
  • 1 tablespoon plus 2 teaspoons sea salt
  • 2 large eggs
  • 1/2 cup extra-virgin olive oil
  • 2 cups all-purpose flour
  • 1 tablespoon finely chopped fresh sage leaves
  • 2 teaspoons freshly grated lemon zest
  • 1/2 teaspoon coarsely ground black pepper
  • 4 to 6 cups peanut oil for deep-frying
Instructions
To make the sponge:
  1. In a small bowl, combine the water, flour and yeast. Mix well and set aside in a warm place until yeasty-smelling and covered in very small bubbles, about 45 minutes.
  2. In a medium saucepan, cover the potatoes with cold water. Bring the water to a boil over high heat, add 1 tablespoon of sea salt. Reduce the heat to a simmer, and cook until the potatoes are tender, 20 to 25 minutes. Drain and mash the potatoes with a fork. Allow them to cool.
  3. Potato and Sage Fritters
  4. In a small bowl, whisk together the eggs and olive oil until thoroughly combined. In a bowl, combine cooled potatoes with the sponge, flour, sage, lemon zest, pepper, and 2 teaspoons of salt. Mix to evenly distribute the ingredients. Add the egg mixture to potato mixture, and stir until thoroughly combined. Use a rubber spatula to scrape down the sides of the bowl. You should have a thick, sticky batter. Add a bit more flour, if needed. Cover the bowl with a towel and set aside in a warm place to rise until doubled in size, for 1 1/2 to 2 hours.
  5. Heat the oil in a deep-fryer or heavy pot to 190C (375F).
  6. Potato and Sage Fritter Batter Risen
  7. Scoop 1 tablespoon of the risen batter at a time, and use another spoon to scrape it into the hot oil. Don't crowd the fryer. Fry fritters until golden brown, 2 to 3 minutes, turning them over occasionally. Drain the fritters on paper towels to absorb any excess oil. Sprinkle with salt and serve warm.

We got a great deal on Argentinian asado, or short ribs as they are called in the States. The best part was that they had relatively little fat on them. Slow cooking is a must for this cut of meat, so when I saw this recipe and it didn’t call for slow roasting, I was a bit skeptical. I didn’t have time to marinate them for three days, so maybe that makes the difference. I marinated the ribs for a full 24 hours and then slow roasted (roasting pan, 2 cups of water, covered with foil) them in the oven at 150C (300F) for 1-1/2 hours and then grilled them. They were outstanding and I can only imagine what they would be like if I had marinated them for three days.
We actually had a problem with this recipe because the way the asado is cut here in Israel, the pieces of bone (rib) embedded in the meat are almost three inches long, which means that the thickness of the meat is considerably greater than in the States. This means that you can’t expect to cook it through with just a few minutes on the grill, however hot. In a typical South American grill in Israel (we have quite a few of them just up the road in Kfar Saba, where there is a big Argentinian immigrant community), the asado is often slow grilled for more than an hour on a vertical stand placed a few inches from the fire, which brings out the full flavour in this rather fatty cut of meat.

This marinade is also great on chicken. You can put it directly on the chicken and cook it straight away if you want.

Indian-Style Grilled Short Ribs
Recipe from Chef Floyd Cardoz
Servings: 4
Ingredients
  • 6 garlic cloves coarsely chopped
  • 2 tablespoons finely chopped fresh ginger
  • 1/4 cup dry red wine
  • 3 tablespoons red wine vinegar
  • 3 tablespoons pure maple syrup or honey or date honey
  • 3 tablespoons vegetable oil
  • 3 tablespoons tomato paste
  • 1 tablespoon rosemary leaves
  • 1 tablespoon kosher salt
  • 2 teaspoons thyme
  • 1 1/2 teaspoons freshly ground black pepper
  • 1 teaspoon ground coriander
  • 1/2 teaspoon ground allspice
  • 1/2 teaspoon sweet paprika
  • 1/4 teaspoon ground ginger
  • 1/4 teaspoon ground cloves
  • 1/4 teaspoon cayenne pepper
  • 8 beef short ribs on the bone about 450g (1lb each), trimmed of excess fat
Instructions
  1. In a blender, combine the garlic, ginger and red wine and puree. Scrape the wine puree into a medium bowl and stir in all of the remaining ingredients except the short ribs. Pour the marinade into 2 resealable plastic bags and add the short ribs. Tightly seal the plastic bags and refrigerate the short ribs in the marinade for 3 days.
  2. Indian-style short ribs
  3. Light a grill. Remove the short ribs from the marinade, scraping off any excess. Grill the short ribs over moderately high heat until they are lightly charred and medium-rare, about 5 minutes per side.

Healthier Hannukah

As most of you know, the holiday of Hannukah is all about oil. So, the foods that we eat during this time are fried and oily. This year we decided that we wanted to try and have a more healthier Hannukah. We did have potato pancakes, but I thought we should try a lower carbohydrate latke that wouldn’t make us feel like we were missing out on having yummy carbohydrate-laden potato latkes.

I decided to make cauliflower latkes. Okay, you don’t quite get the crunch of a regular potato latke, but they were very good. They certainly tasted like potato latkes because I put most of the same ingredients that I put in the potato version. My husband gives them a high rating and so do I.

Cauliflower Latkes
Servings: 20 latkes
Ingredients
  • 1 about 1kg or 2 pounds large cauliflower, trimmed and chopped into 1-inch pieces
  • 1 medium onion finely chopped
  • 2 tablespoons vegetable oil
  • 1/2 cup seasoned bread crumbs or whole wheat breadcrumbs
  • 1 teaspoon fresh or 1/4 teaspoon dry thyme
  • 2 tablespoons minced fresh parsley
  • 2 green onions sliced, including the green part
  • 2 large eggs lightly beaten
  • Salt to taste
  • Freshly ground pepper to taste
  • 4 Tablespoons vegetable oil for frying
Instructions
  1. Steam the cauliflower until tender, but not mushy. Mash to the consistency of mashed potatoes with 1/4-inch lumps. Drain any excess moisture.
  2. Meanwhile, gently saute onions in vegetable oil over medium-low heat until soft and lightly browned, about 10 minutes. Remove from heat and let cool about 5 minutes.
  3. Combine the mashed cauliflower, sauteed onions, bread crumbs, thyme, parsley, green onion, eggs, salt, and pepper with a wooden spoon.
  4. Heat about 4 tablespoons of oil in a deep skillet.
  5. Scoop out a heaping tablespoon of the cauliflower mixture into your hands and compress into a patty about 1/2-inch thick. Place patty in hot oil to fry. Repeat with remaining cauliflower, cooking 4 to 5 patties at a time, flipping when golden on the first side. Do not crowd pan or they will not brown and crisp properly. Drain cauliflower latkes on paper towels and keep warm in the oven at 250 F. until all are completed.

Italian Hannukah

The first night of Hannukah we were invited to a friend’s house to celebrate with their family. We had a nice meal of mushroom soup, potato latkes, butternut squash and curry latkes, salad, homemade Merlot wine and peapod wine. It was a delicious dinner.

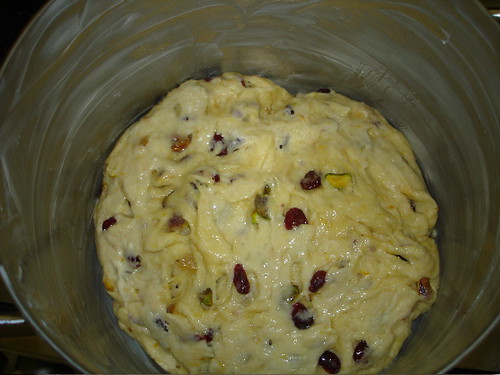
I volunteered to bring dessert and instead of bringing soufganyiot, I decided to make an Italian holiday dessert, Panettone in honor of my Italian ancestry. A couple of years ago, I found an interesting take on this sweet bread which is usually made with raisins and candied fruit. The one I made is called Cranberry Pistachio Panettone. It is an eggy, buttery sweet bread, but not too sweet. I like it better than the panettone I used to buy in Milano and Lugano. It is really easy to make, just a little time consuming because of the rising time, but well worth the wait. You can freeze it, just make sure you wrap it well.

I baked it in a tall, narrow cooking pot that I use to cook pasta or asparagus. If you can find a paper panettone form, then use that. I could find one in any of the baking shops. You can also be decadent and make this with dried tart cherries instead of cranberries.

Happy Hannukah!

I would like to wish everyone Chag Hannukah Sameach! Happy Hannukah!

I have a lot of catching up to do. I am going to interrupt the Italy posts and write about Hannukah. There will be lots of frying and a few goodies to post about in the next few days.  I am making Hannukah goodies from Italy, Morocco and Germany.

So, watch this space …. I will be posting every night starting tomorrow.

Baroness' Hometown – Verona – Part I

Well, not exactly my hometown, but it was the home town of my ancestor, the Baron. However, after visiting Verona, I wouldn’t be ashamed to call it my home; it is a beautiful city. You won’t see any pictures referring to Romeo and Juliet because I avoided that trap. The city has much more to offer that fake balconies and possible houses of Shakespeare’s ill-fated lovers from his famous and beloved play. My only complaint about Verona is that it is very difficult to navigate around the city. The street signs have either not been replaced since the Roman Empire ;-), which means you can’t find them because they have faded on the facade of a building or there is no street sign. It is very frustrating.

We did not stay at a romantic hotel in Verona. We stayed at a Holiday Inn about 15 minutes drive from the old city because I had enough Priority Club points for two free nights. It was a decent Holiday Inn that had been recently renovated. The breakfast buffet was included and was not the best Holiday Inn breakfast buffet, but certainly not the worst.

Verona became a Roman Municipality in 49 B.C. So, the layout of the old city is based on the typical Roman military grid. Originally the Arena and Piazza Bra were on the outskirts of the city.

One of the most impressive pieces of architecture in Verona is the Roman Amphitheatre, called the Arena, which means sand and refers to the sand that was spread in the middle of the amphitheatre to absorb the blood and cushion the gladiators falls. It was built at the beginning of the 1st century AD, some 50 years before the Colosseum of Rome and was the third largest amphitheatre in the Roman Empire. It could hold approximately 30,000 people, which was more than the population of the city itself. In the Middle Ages, it was used as a fortress and its arches became workshops, shops and bordellos. In August 1913, a performance of Aida was held at the Arena on what would have been Giuseppe Verdi’s birthday and it has been hosting the summer opera festival ever since. It is an impressive structure and a real testament to Roman architecture.

Verona is a walkable city, with new surprises around every corner. Buildings with frescoes, like the ones above.

And, beautiful brickwork. This is the inner courtyard of and the Scala della Ragione or Steps of Reason leading up to the Scala family’s palazzo. The Scalas were one of the rulers of Verona in the 17th century.

There are also beautiful piazzi to walk around and dream about another time.

I guess you are wondering about the food…..

Since this was the beginning of our trip, we were trying to behave ourselves and believe it or not we didn’t buy any sweet treats. It is true!

We did have some decent food in Verona. Nothing fancy, just nice simple meals.

Our first evening in Verona we decided to go some where near the hotel and the front desk at our hotel recommended Osteria Mattarana. This was a nice and simple restaurant that was full of locals. We were the only tourists in sight and since we both speak Italian, we fit right in. We were a bit shy about taking pictures, but everything we had was delicious. We had the following:

Il tritone – we shared this

An antipasti consisting of carpaccio of smoked swordfish, triangles of polenta with smoked pike and smoked salmon with  rocket (arugala) butter

Il fettucine di pasta fresca ai porcini tartufati – my husband

Fresh fettucine with porcini mushrooms and a sprinkling of black truffles

Pizza Misto Bosco – me

A pizza with sauteed wild mushrooms

The food was delicious and not too expensive. I would definitely eat there again. They are famous for there inhouse cured meats and their steaks.

Stay tuned for Part II 

Bergamo

The medieval walled town of Bergamo is a charming town with piazzas, palazzi and frescoed churches that owes much of its beauty to 370 years of Venetian rule.

We decided to stop here on the way to our first stop of our trip, Verona. I had been to Bergamo about 14 years ago when I was living in Lugano and I remembered it as a charming town. It was still as charming as I remembered and it was a perfect stop on the way to Verona.

Bergamo is made up of Bergamo Basso (Lower Bergamo) and Bergamo Alta (Upper Bergamo). Bergamo Alta is high above the lower town and can either be reached by taking the funicular or driving up and parking in one of the public parking lots that are hidden in the narrow cobble-stoned streets of the old town.

The main sites in Bergamo Alta are:

  • Piazza Vecchia (old square)

  • Palazzo della Ragione. It was the seat of the administration of the city in the communal age. It is now the site of exhibitions. Erected in the 12th century, it was rebuilt in the late 16th century by Pietro Isabello. The façade has the lion of St. Mark over a mullioned window, testifying to the long period of Venetian dominance. The atrium has a well-preserved 18th century sundial.

  • Basilica di Santa Maria Maggiore (Saint Mary Major). It was built from 1137 on the site of a previous religious edifice of the 7th century. Construction lasted until the 15th century. Of this first building remains the external Romanesque structure and the Greek cross plan, while the interior was widely modified in the 16th and 17th centuries. Noteworthy are the great Crucifix and the tomb of Gaetano Donizetti. The dome has frescoes by Giovanbattista Tiepolo.

  • Cappella Colleoni (Colleoni chapel), annexed to Santa Maria Maggiore, a masterwork of Renaissance architecture and decorative art.
  • The Rocca (Castle). It was begun in 1331 on hill of the Sant’Eufemia by William of Castelbarco, vicar of John of Bohemia, and later completed by Azzone Visconti. A wider citadel was also added, but it is now partly lost. The Venetians built a large tower in the Rocca, as well as a line of walls (Mura Veneziane) 6,200 metres long.

  • Palazzo della Ragione and the nearby Biblioteca Angelo Mai (Palazzo Nuovo), designed by Vincenzo Scamozzi.

One of Bergamo’s famous son’s is the famous opera composer Gaetano Donizetti. He was most famous for writing the opera Lucia di Lammermoor.

Bergamo is also famous for its polenta and cheeses. Unfortunately, we did not have time to try either of these, but I have fond memories of eating polenta with taleggio cheese and a wild mushroom ragu. The soft, creamy polenta mixed with taleggio cheese and sage and served with a delicious wild mushroom ragu. It was the perfect meal for a cold day. Of course the cold didn’t stop me from having gelato. I had some at the same gelateria with my husband and the pistachio gelato was a good as I remembered it.

Soft Polenta with a Wild Mushroom Ragu
Ingredients
For the polenta:
  • 1 cup polenta
  • 4 cups water
  • 1 teaspoon fine sea salt
  • ½ teaspoon freshly ground black pepper
  • 1 tablespoon unsalted butter
  • 3 tablespoons finely grated parmesan Reggiano
For the ragu:
  • 1 cup heavy cream
  • 1/2 teaspoon fresh minced (¼ teaspoon dried) thyme
  • 1/8 teaspoon freshly grated nutmeg
  • 1/4 cup freshly grated parmesan
  • 1 teaspoon virgin olive oil
  • 1 cup small cremini mushrooms cleaned, stemmed, and quartered
  • 1/2 cup assorted wild mushrooms cleaned and, if large, sliced
  • 2 medium shallots minced (2 tablespoons)
  • 1 small clove garlic minced (1 teaspoon)
  • 1/2 teaspoon fine sea salt
  • 1/2 teaspoon freshly ground black pepper
  • 1 tablespoon freshly chopped parsley
Instructions
  1. Place the polenta and water in a heavy-bottomed 2 ½ quart saucepan (preferably one with fluted sides) and stir to combine. Set the pan over medium-high heat and bring to a simmer, stirring constantly with a wooden spoon, until the grains are soft and hold their shape on a spoon, about an hour. Whisk in the salt, pepper, butter, and parmesan. Cover and keep warm. (The polenta may be transferred to a bowl, covered and set over barely simmering water. If necessary, thin the polenta with hot water before serving.)
  2. While the polenta is cooking, pour the cream into a second heavy-bottomed saucepan and simmer over low heat until it is thick and reduced by half, about 15 minutes. Whisk in the thyme, nutmeg, and parmesan. Remove from the heat and set aside.
  3. Heat a large skillet over high heat, 2 minutes. Add the olive oil and swirl to coat. Add the cremini mushrooms. Sear and stir intermittently until the mushrooms release their juices and begin to brown, about 3 minutes. Stir in the wild mushrooms, shallots and garlic and continue to sautée over high heat until the mushrooms are tender, 2 minutes. Stir in the salt and pepper. Add the reserved cream and parsley and stir to coat. Taste for seasoning.
  4. To serve: Scoop the polenta onto warm appetizer plates, leaving an indentation on the top. Spoon the mushroom ragout over. Serve immediately.